When building your .NET applications, you will often need to generate API documentation. To do this, you might use Swagger, a toolkit that makes it simple to provide a graphical representation of your API. You can test the API methods within the Swagger UI once the API documentation is available.
If you could use an introduction to Swagger, I provided one in an earlier article. In this article, I’ll discuss how we can implement basic authentication for Swagger. To work with the code examples provided in this article, you should have Visual Studio 2022 installed in your system. If you don’t already have a copy, you can download Visual Studio 2022 here.
Create an ASP.NET Core Web API project in Visual Studio 2022
First off, let’s create an ASP.NET Core project in Visual Studio 2022. Following these steps to create a new ASP.NET Core Web API project in Visual Studio 2022:
- Launch the Visual Studio 2022 IDE.
- Click on “Create new project.”
- In the “Create new project” window, select “ASP.NET Core Web API” from the list of templates displayed.
- Click Next.
- In the “Configure your new project” window, specify the name and location for the new project.
- Optionally check the “Place solution and project in the same directory” check box, depending on your preferences.
- Click Next.
- In the “Additional Information” window shown next, select .NET 6 (or later) as the target framework from the drop-down list at the top. Set “Authentication Type” to “None” (default) and check the last two check boxes (Use controllers and Enable OpenAPI support).
- Ensure that the “Enable Docker” and “Configure for HTTPS” check boxes are unchecked as we won’t be using those features here.
- Click Create.
You should now have a new ASP.NET Core Web API project ready to go. We’ll use this project to implement basic authentication for Swagger in the subsequent sections of this article.
Configure Swagger to enable OpenAPI support
The OpenAPI Specification, formerly known as the Swagger Specification, defines a standard, machine-readable, programming language-agnostic interface description language for APIs. By effectively mapping all of the resources and processes associated with an API, a Swagger definition establishes a RESTful interface for conveniently designing and consuming the API.
Because we enabled OpenAPI support when we created our ASP.NET Core Web API project, the Swashbuckle.AspNetCore package will be added to the project automatically. Swashbuckle is an open source project that enables the generation of Swagger documentation in ASP.NET Core.
If you created your project without enabling OpenAPI support, you will have to install the Swashbuckle package via the NuGet Package Manager Console as shown below.
PM> Install-Package Swashbuckle.AspNetCore
When you open the Program.cs file, you should see the following code.
var builder = WebApplication.CreateBuilder(args);
builder.Services.AddControllers();
builder.Services.AddEndpointsApiExplorer();
builder.Services.AddSwaggerGen();
var app = builder.Build();
if (app.Environment.IsDevelopment())
{
    app.UseSwagger();
    app.UseSwaggerUI();
}
app.UseAuthorization();
app.MapControllers();
app.Run();
Using the Swagger UI
When you execute the application, you should see the Swagger UI displayed in the web browser as shown in Figure 1 below.
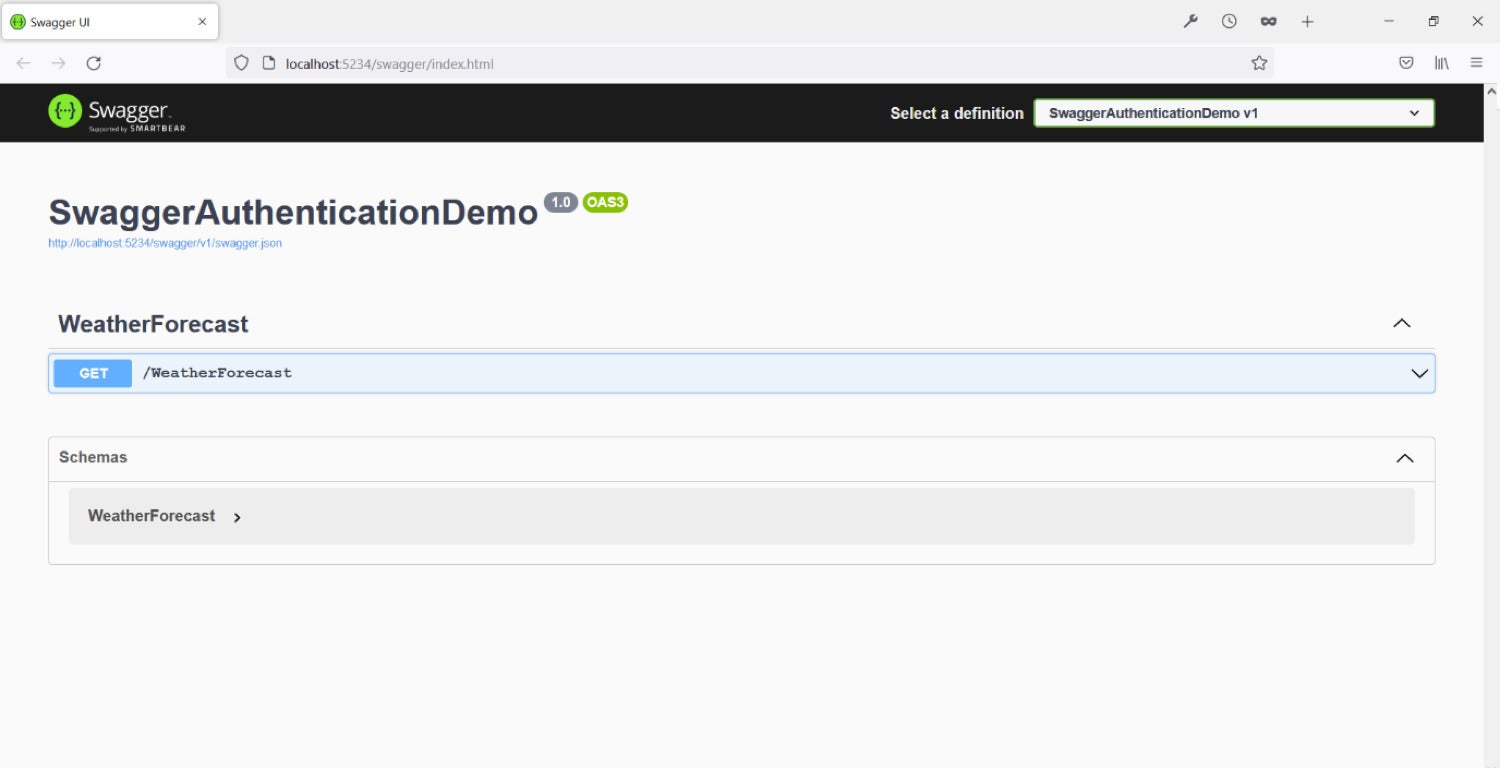 IDG
IDGFigure 1. The Swagger UI.
As you can see, the Swagger UI shows the WeatherForecast controller that is created by default when you create a new ASP.NET Core API project. There is just one HttpGet action method in this controller.
You can execute the endpoint without having to specify any authentication information, and the output should be similar to Figure 2.
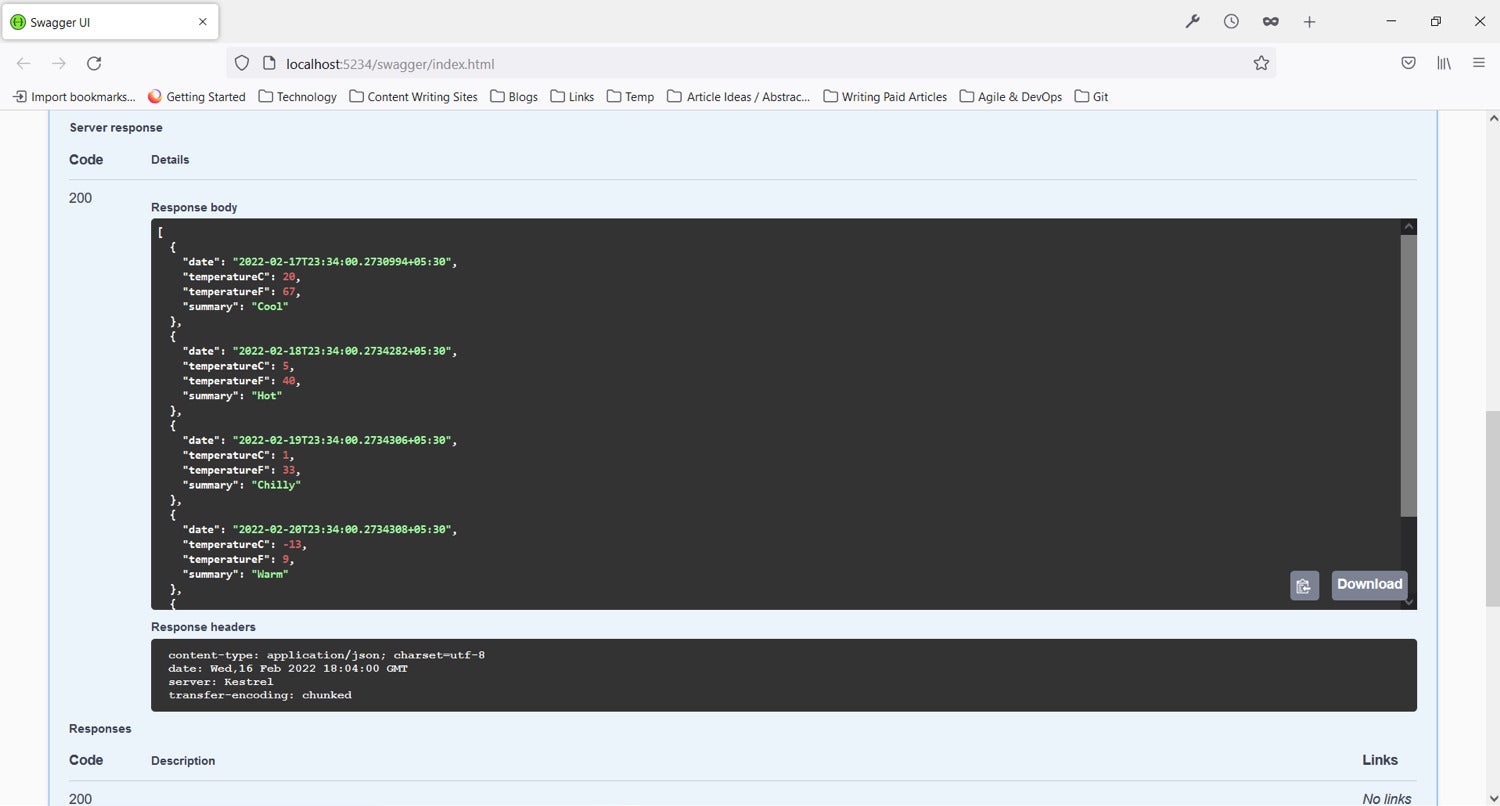 IDG
IDGFigure 2. The output of the HttpGet action method in the Swagger UI.
We’ll learn how to implement authentication for Swagger shortly. Let’s first create a new API controller to validate user credentials and return a JSON Web Token (JWT) if the credentials are valid.
Create a login controller in ASP.NET Core
Create a new class named LoginDTO in a file with the same name and a .cs extension. Now enter the following code in your new LoginDTO file.
    public class LoginDTO
    {
        public string UserName { get; set; }
        public string Password { get; set; }
    }
Create a new API controller named LoginController and insert the following code.
    [Route("api/[controller]")]
    [ApiController]
    public class LoginController : ControllerBase
    {
        [HttpPost, Route("login")]
        public IActionResult Login(LoginDTO loginDTO)
        {
            try
            {
                if (string.IsNullOrEmpty(loginDTO.UserName) ||
                string.IsNullOrEmpty(loginDTO.Password))
                    return BadRequest("Username and/or Password not specified");
                if (loginDTO.UserName.Equals("joydip") &&
                loginDTO.Password.Equals("joydip123"))
                {
                    var secretKey = new SymmetricSecurityKey
                    (Encoding.UTF8.GetBytes("thisisasecretkey@123"));
                    var signinCredentials = new SigningCredentials
                    (secretKey, SecurityAlgorithms.HmacSha256);
                    var jwtSecurityToken = new JwtSecurityToken(
                        issuer: "ABCXYZ",
                        audience: "http://localhost:51398",
                        claims: new List<Claim>(),
                        expires: DateTime.Now.AddMinutes(10),
                        signingCredentials: signinCredentials
                    );
                    Ok(new JwtSecurityTokenHandler().
                    WriteToken(jwtSecurityToken));
                }
            }
            catch
            {
                return BadRequest
                ("An error occurred in generating the token");
            }
            return Unauthorized();
        }
    }
The LoginController contains only one HttpPost action method. Note how the user credentials are validated and the JSON Web Token is generated.
Authenticate the Swagger UI in ASP.NET Core
To implement authentication for Swagger, write the following code in the Program class.
builder.Services.AddSwaggerGen(option =>
{
    option.SwaggerDoc("v1", new OpenApiInfo { Title = "Demo API", Version = "v1" });
    option.AddSecurityDefinition("Bearer", new OpenApiSecurityScheme
    {
        In = ParameterLocation.Header,
        Description = "Please enter a valid token",
        Name = "Authorization",
        Type = SecuritySchemeType.Http,
        BearerFormat = "JWT",
        Scheme = "Bearer"
    });
    option.AddSecurityRequirement(new OpenApiSecurityRequirement
    {
        {
            new OpenApiSecurityScheme
            {
                Reference = new OpenApiReference
                {
                    Type=ReferenceType.SecurityScheme,
                    Id="Bearer"
                }
            },
            new string[]{}
        }
    });
});
Apply the Authorize attribute in ASP.NET Core
Next, apply the Authorize attribute on the HttpGet action method of the WeatherController as shown in the code snippet given below.
[HttpGet(Name = "GetWeatherForecast"), Authorize]
public IEnumerable<WeatherForecast> Get()
{
   return Enumerable.Range(1, 5).Select(index => new WeatherForecast
   {
                Date = DateTime.Now.AddDays(index),
                TemperatureC = Random.Shared.Next(-20, 55),
                Summary = Summaries[Random.Shared.Next(Summaries.Length)]
   })
   .ToArray();
}
With the Authorization attribute applied, an authentication token will now be required to execute this endpoint in Swagger.
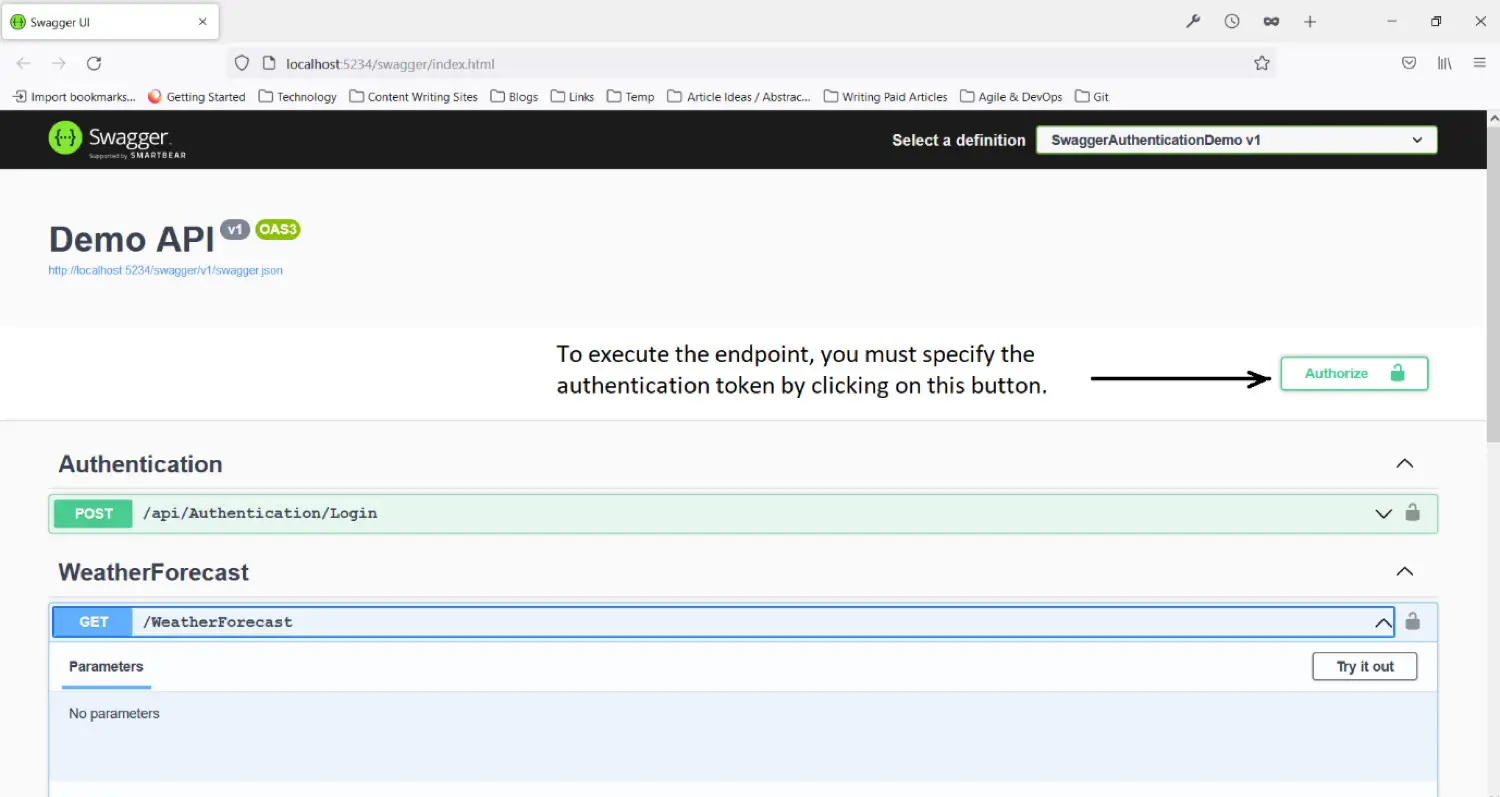 IDG
IDGFigure 3. The Authorize button in the Swagger UI.
Generate a JWT token in ASP.NET Core
Now, execute the HttpPost action method of the LoginController and specify the credentials as shown in Figure 4.
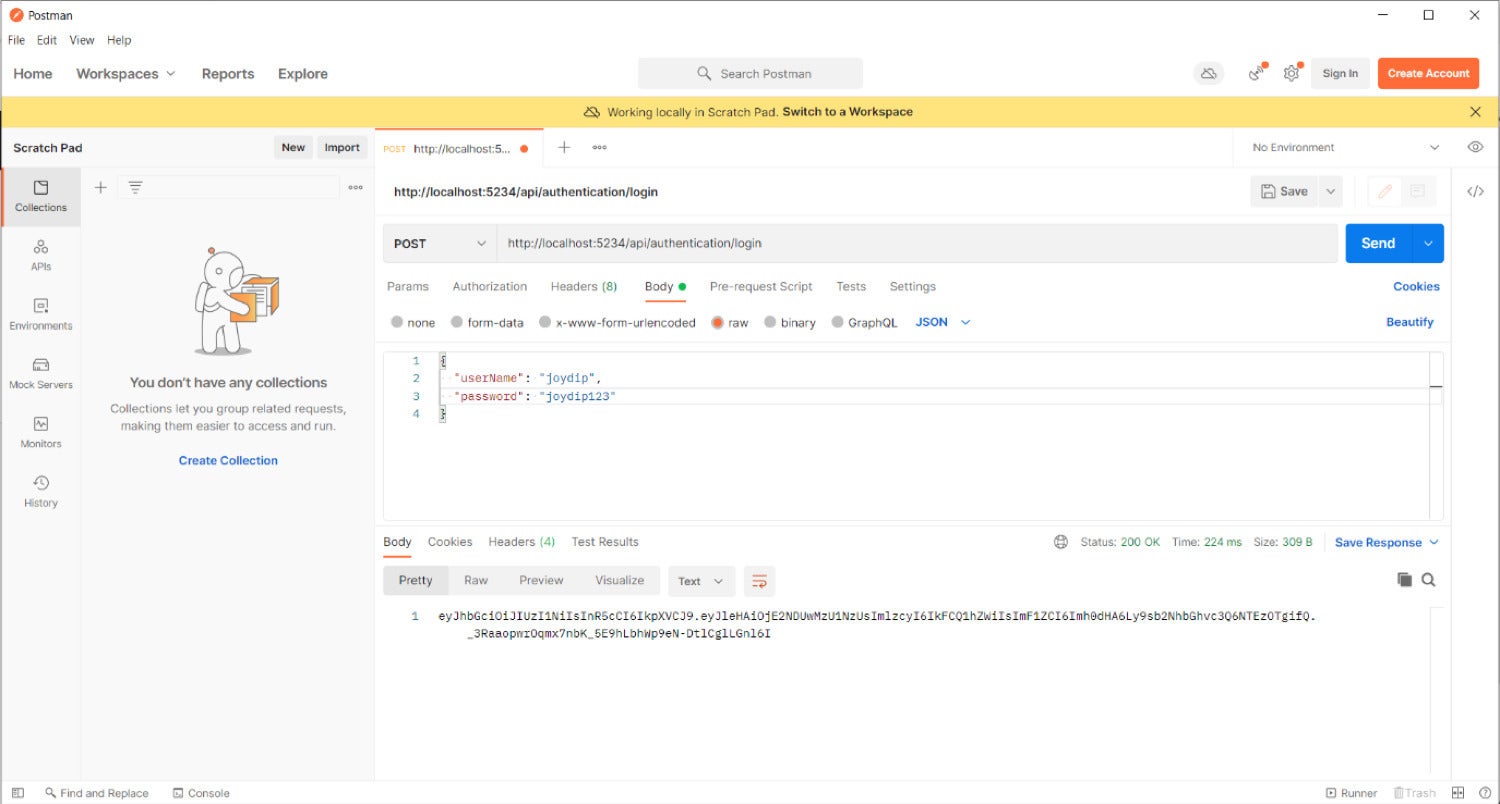 IDG
IDGFigure 4. The JSON Web Token is generated.
Lastly, you can execute the same endpoint again in the Swagger UI after specifying the authentication token. The endpoint will work this time and you’ll be able to see the output in the Swagger UI.
Swashbuckle is a great tool for generating Swagger documents for your ASP.NET Core APIs. It is quite easy to configure and customize. You can use Swashbuckle and Swagger with minimal APIs in ASP.NET Core as well.
Copyright © 2023 IDG Communications, Inc.


