There are several ways to secure your APIs in ASP.NET Core 7. You can use a user authentication mechanism such as JWT tokens, ASP.NET Core Identity, bearer tokens, OpenID Connect, or an OAuth 2.0 identity provider, to name a few. API key authentication is yet another approach you can adopt to help secure your APIs.
Note that API key authentication does not identify or authenticate the user. Rather, API key authentication uses API keys to authenticate the applications or services that access your APIs. An API key is a token or unique identifier that is passed to an API via request header, cookie, or query string.
API keys can be used to control which applications may access your API, track their usage patterns, or restrict which methods of your API they can use. However, API keys are insufficient for secure authorization. For that, you would also need to implement user authentication.
In this article, we’ll examine how to implement API key authentication in ASP.NET Core 7. To use the code examples provided below, you should have Visual Studio 2022 installed in your system. If you don’t already have a copy, you can download Visual Studio 2022 here.
Create an ASP.NET Core Web API project in Visual Studio 2022
First off, let’s create an ASP.NET Core 7 Web API project in Visual Studio 2022. Follow these steps:
- Launch the Visual Studio 2022 IDE.
- Click on “Create new project.”
- In the “Create new project” window, select “ASP.NET Core Web API” from the list of templates displayed.
- Click Next.
- In the “Configure your new project” window, specify the name and location for the new project.
- Optionally check the “Place solution and project in the same directory” check box, depending on your preferences.
- Click Next.
- In the “Additional Information” window shown next, leave the “Use controllers (uncheck to use minimal APIs)” box checked, since we won’t be using minimal APIs in this project. Leave the “Authentication Type” set to “None” (the default).
- Ensure that the check boxes “Enable Open API Support,” “Configure for HTTPS,” and “Enable Docker” remain unchecked as we won’t be using those features here.
- Click Create.
We’ll use this ASP.NET Core 7 Web API project to work with API key authentication in the sections below.
Implement API key authentication using middleware
Basically, you can implement API key authentication in ASP.NET Core in two different ways: using custom attributes or using middleware. We’ll explore both of these approaches, starting with middleware.
You can leverage middleware components in ASP.NET Core to customize how requests are processed and to inspect, route, and alter messages as they traverse the request processing pipeline. Here we’ll build a custom middleware to authenticate calls to our APIs.
Create a new .cs file named CustomApiKeyMiddleware in the Web API project we created earlier. Your custom middleware should have a constructor that accepts an argument of type RequestDelegate as shown in the code snippet given below.
public class CustomApiKeyMiddleware
{
    private readonly RequestDelegate _next;
    const string API_KEY = "Api_Key";
    public CustomApiKeyMiddleware(RequestDelegate next)
    {
        _next = next;
    }
}
Since you’ll need to access an instance of type IConfiguration to read the Api_Key string from the AppSettings.json file, you should pass a reference of type IConfiguration as a parameter in the constructor as shown below.
public class CustomApiKeyMiddleware
{
    private readonly IConfiguration Configuration;
    private readonly RequestDelegate _next;
    const string API_KEY = "Api_Key";
    public CustomApiKeyMiddleware(RequestDelegate next, IConfiguration configuration)
    {
        _next = next;
        Configuration = configuration;
    }
}
Your custom middleware should compare the Api_Key read from the AppSettings.json file with the one passed in the request header when invoking the endpoint. If the two match, the application grants access to the endpoint, otherwise, an appropriate error messge is returned in the response.
The complete source code of the CustomApiKeyMiddleware class is given below for reference:
public class CustomApiKeyMiddleware
{
    private readonly IConfiguration Configuration;
    private readonly RequestDelegate _next;
    const string API_KEY = "Api_Key";
    public CustomApiKeyMiddleware(RequestDelegate next,
    IConfiguration configuration)
    {
        _next = next;
        Configuration = configuration;
    }
    public async Task Invoke(HttpContext httpContext)
    {
        bool success = httpContext.Request.Headers.TryGetValue
        (API_KEY, out var apiKeyFromHttpHeader);
        if (!success)
        {
            httpContext.Response.StatusCode = 401;
            await httpContext.Response.WriteAsync("The Api Key for
            accessing this endpoint is not available");
            return;
        }
        string api_key_From_Configuration = Configuration[API_KEY];
        if (!api_key_From_Configuration.Equals(apiKeyFromHttpHeader))
        {
            httpContext.Response.StatusCode = 401;
            await httpContext.Response.WriteAsync("The authentication
            key is incorrect : Unauthorized access");
            return;
        }
        await _next(httpContext);
    }
}
To use the middleware, you should add it to the request processing pipeline by including the following code in the Program.cs file.
app.UseMiddleware<CustomApiKeyMiddleware>();
Now, let’s run the application and browse to the WeatherForecast endpoint in Postman. Note that if you do not specify an Api_Key string in your AppSettings.json file, you will see the appropriate message as shown in Figure 1 below.
 IDG
IDGFigure 1. Authentication fails because no Api_Key value was passed in the request header.
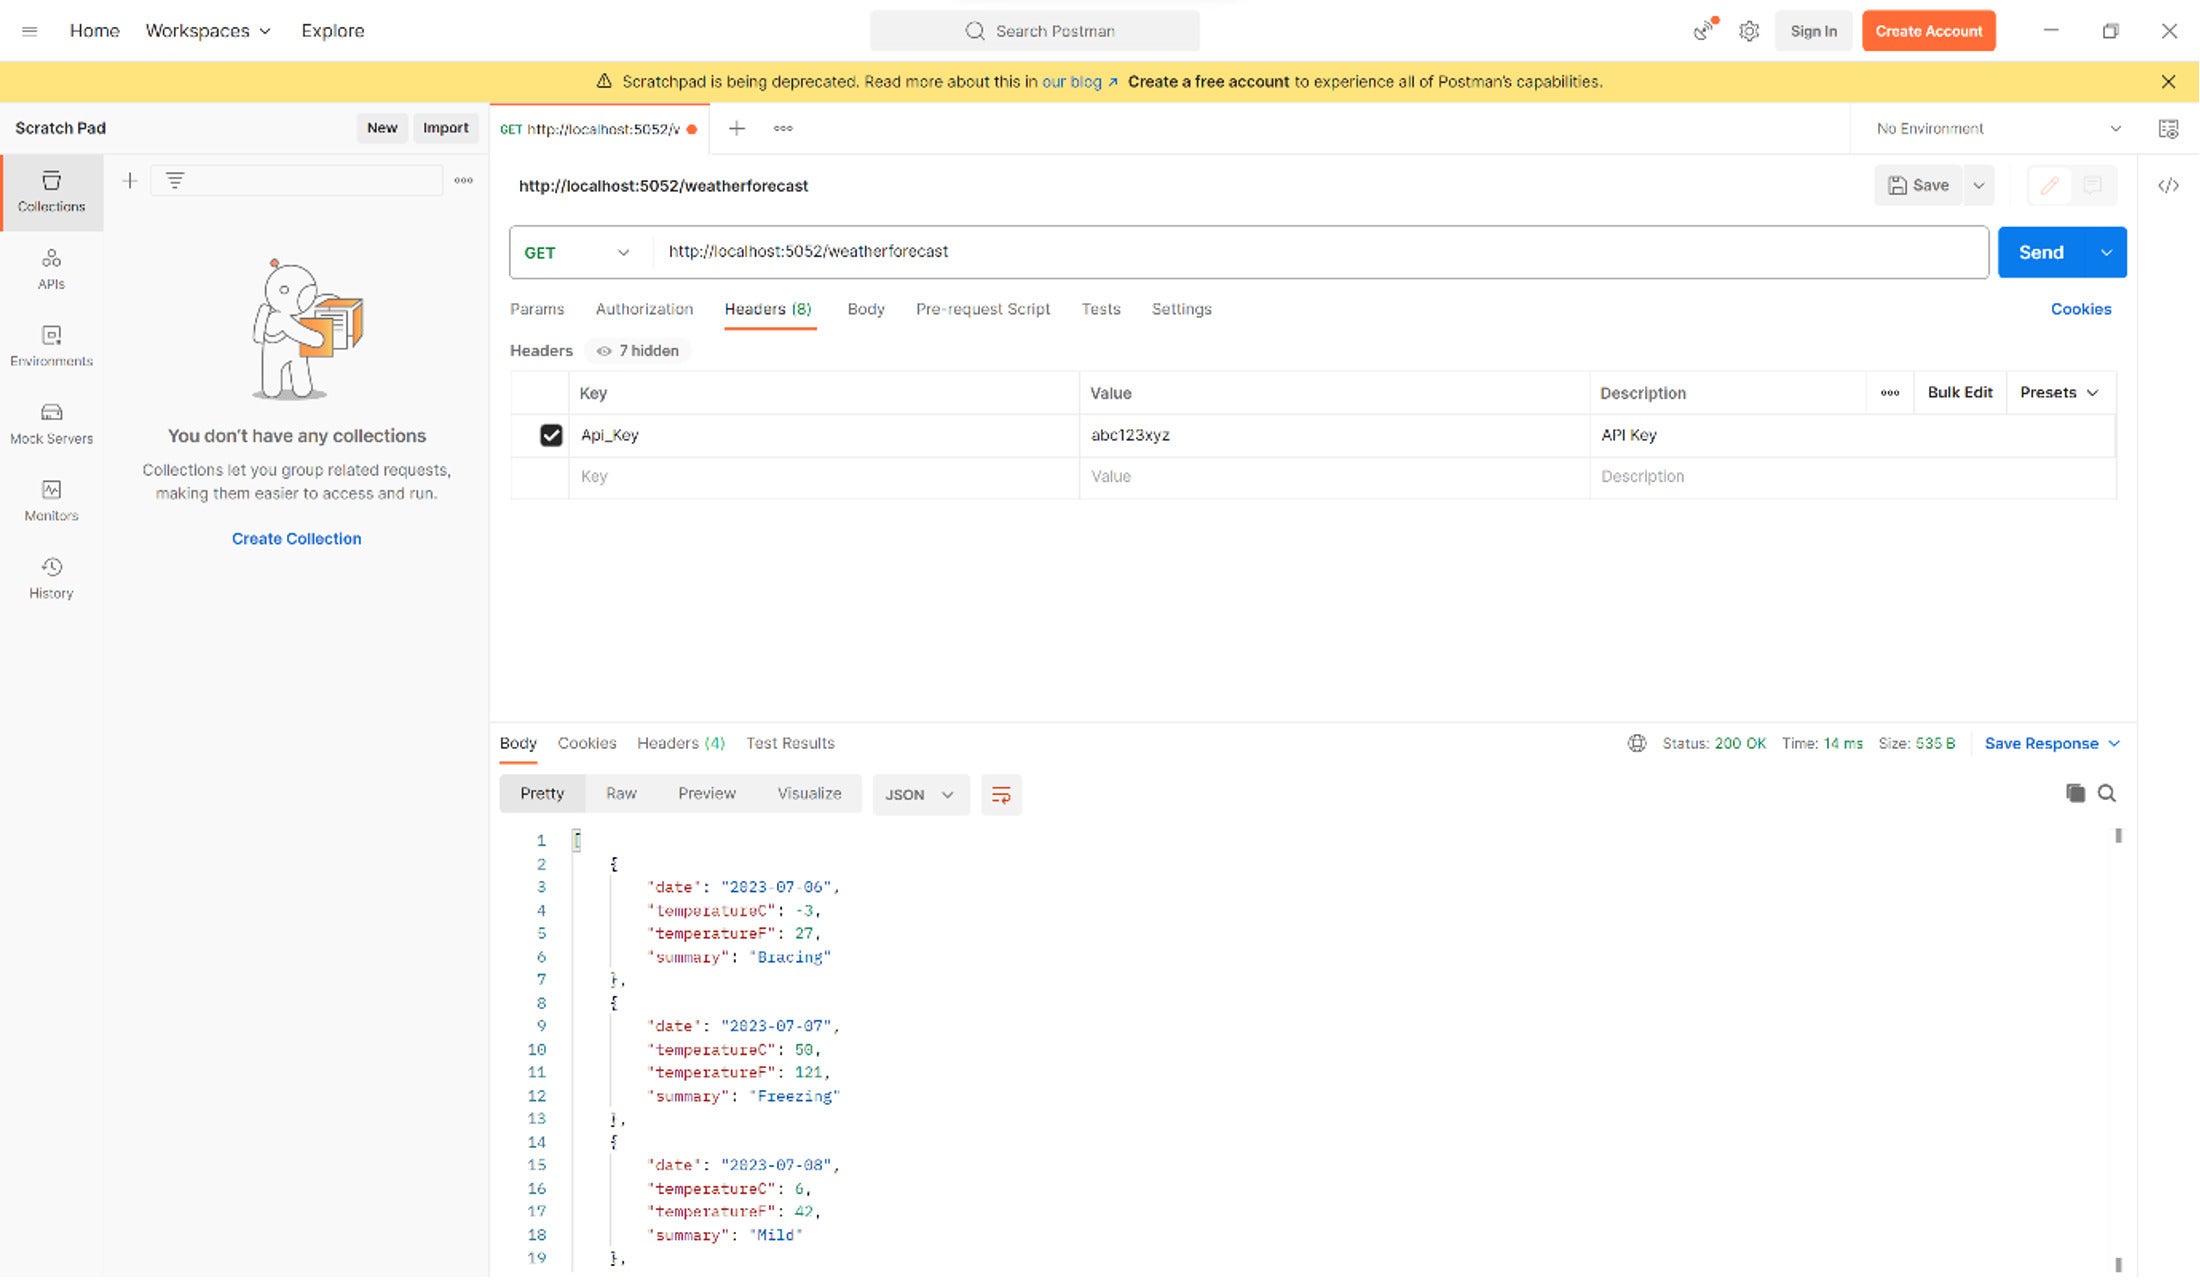
When you pass the Api_Key value in the request header using Postman, the endpoint will return data successfully as shown in Figure 2.
 IDG
IDGFigure 2. The Api_Key value is passed successfully and the data is returned.
Implement API key authentication using custom attributes
Let’s now examine how to implement API key authentication using custom attributes. An attribute is just like any other class that extends the System.Attribute class. Create a new .cs file named CustomApiKeyAttribute and enter the following code in there.
public class CustomApiKeyAttribute : Attribute, IAsyncActionFilter
{
    private const string API_KEY = "Api_Key";
    public async Task OnActionExecutionAsync
           (ActionExecutingContext context, ActionExecutionDelegate next)
    {
        bool success = context.HttpContext.Request.Headers.TryGetValue
            (API_KEY, out var apiKeyFromHttpHeader);
        if (!success)
        {
            context.Result = new ContentResult()
            {
                StatusCode = 401,
                Content = "The Api Key for accessing this endpoint is not available"
            };
            return;
        }
        IConfigurationBuilder configurationBuilder = new ConfigurationBuilder();
        configurationBuilder.AddJsonFile("AppSettings.json");
        IConfiguration Configuration = configurationBuilder.Build();
        string api_key_From_Configuration = Configuration[API_KEY];
        if (!api_key_From_Configuration.Equals(apiKeyFromHttpHeader))
        {
            context.Result = new ContentResult()
            {
                StatusCode = 401,
                Content = "The Api key is incorrect : Unauthorized access"
            };
            return;
        }
        await next();
    }
}
You can now apply the attribute on your controller class as shown in the code snippet given below.
[CustomApiKey]
[ApiController]
[Route("[controller]")]
public class WeatherForecastController : ControllerBase
{
    //Code omitted for brevity
}
Now, run the application again and specify a wrong Api_Key using Postman. You should see the appropriate error message displayed as shown in Figure 3.
 IDG
IDGFigure 3. Passing an incorrect Api_Key value via Postman will result in an unauthorized request and no data will be returned.
Conclusion
Note that API key authentication is used to validate the calls to our APIs, not the user. In other words, API keys are used to authenticate the applications that send requests to our APIs. API keys are useful for identifying the applications and services using your API, controlliing or limiting their access to your API methods, and monitoring their usage patterns, but they cannot be used to identify individual users.
API key authentication has nothing to do with user authentication, i.e., validating the credentials of the user of the application making the request. For truly secure authorization, you must use some kind of user authentication mechanism.
Copyright © 2023 IDG Communications, Inc.


